Ironic
Overview
Ironic is an OpenStack project which provisions bare metal (as opposed to virtual) machines. This document describes deploying charmed OpenStack with Ironic. It is important to have Upstream Ironic Documentation as context.
Note
Ironic is supported by Charmed OpenStack starting with OpenStack Ussuri on Ubuntu 18.04.
Currently, charmed Ironic requires Neutron OpenVSwtich as the SDN and does not support OVN.
Charms
There are three Ironic charms:
ironic-api (Ironic API)
ironic-conductor (Ironic Conductor)
neutron-api-plugin-ironic (Neutron API Plugin Ironic API)
SDN plugin subordinate to Neutron API
Deployment considerations
See Example Bundle for a known working configuration. The bundle deploys an
instantiation of nova-compute dedicated to Ironic. The virt-type is set to
‘ironic’ in order to indicate to Nova that bare metal deployments are available.
Note
The Ironic instantiation of nova-compute does not require compute or network resources and can therefore be deployed in a LXD container.
nova-ironic:
  charm: cs:~openstack-charmers-next/nova-compute
  series: focal
  num_units: 1
  bindings:
    "": *oam-space
  options:
    enable-live-migration: false
    enable-resize: false
    openstack-origin: *openstack-origin
    virt-type: ironic
  to:
    - "lxd:3"
Network topology
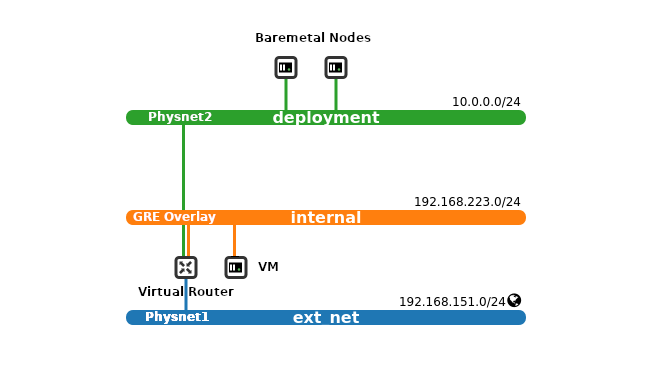
The primary consideration for a charmed OpenStack deployment with Ironic is the network topology. In a typical OpenStack deployment one will have a single provider network for the “external” network where floating IPs and virtual router interfaces will be instantiated. Some topologies may also include an “internal” provider network. For the charmed Ironic deployment we recommend a dedicated provider network (i.e. physnet) for bare metal deployment. There are other ML2 solutions that support the bare metal VNIC type. See the enabled-network-interfaces setting on the ironic-conductor charm.
Note
This dedicated network will not be managed by MAAS as Neutron will provide DHCP in order to enable Ironic to respond to bare metal iPXE requests.
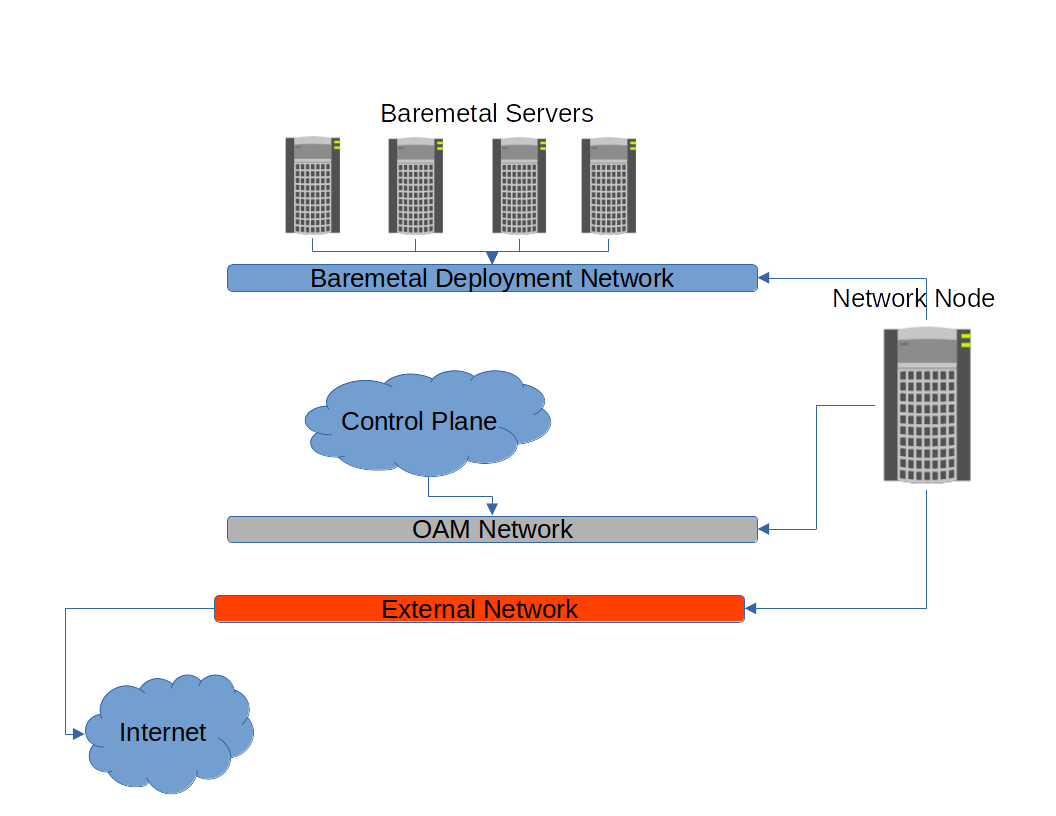
In the examples below the network node will have three interfaces:
enp1s0: OAM network (network the infrastructure is deployed on)
enp7s0: External - physnet1
enp8s0: Deployment - phystnet2
See the documentation in this guide for Neutron networking deployment.
In the bundle the relevant settings for neutron-gateway are:
neutron-gateway
  options:
    bridge-mappings: physnet1:br-ex physnet2:br-deployment
    data-port: br-ex:enp7s0 br-deployment:enp8s0
The view from outside OpenStack will look something like:

The view from inside OpenStack will look something like:

Note
Ironic conductor (in the control plane cloud above) requires network connectivity both to the bare metal nodes on the bare metal deployment network and to the power management interfaces for the bare metal nodes (not shown in the diagram above).
In addition, the baremetal nodes themselves require network connectivity to the ironic-api to acquire metadata and the object-store (Swift or RadosGW) to acquire images.
Swift backend for Glance
In order to use the direct deployment method (see Ironic deploy interfaces) we need to have Glance store bare metal images in a Swift backend to make them accessible by bare metal servers.
Add a relation between glance and ceph-radosgw:
juju add relation ceph-radosgw:object-store glance:object-store
Post-deployment configuration
Follow the rest of this deployment guide for the typical post-deployment configuration. See Configure OpenStack. The following is specific to Ironic.
Note
The rest of this section provides an example of a bare metal setup with IPv4 and a dedicated provider network (physnet2).
Create the bare metal deployment network
Create the bare metal deployment network on physnet2.
openstack network create \
     --share \
     --provider-network-type flat \
     --provider-physical-network physnet2 \
     deployment

openstack subnet create \
     --network deployment \
     --dhcp \
     --subnet-range 10.0.0.0/24 \
     --gateway 10.0.0.1 \
     --ip-version 4 \
     --allocation-pool start=10.0.0.100,end=10.0.0.254 \
     deployment

export NETWORK_ID=$(openstack network show deployment --format json | jq -r .id)
Building Ironic images
We will need three types of images for bare metal deployments: two for the iPXE process (initramfs and kernel) and at least one bare metal image for the OS one wishes to deploy.
Ironic depends on having an image with the ironic-python-agent (IPA) service running on it for controlling and deploying bare metal nodes. Building the images can be done using the Ironic Python Agent Builder. This step can be done once and the images stored for future use.
IP install prerequisites
Build on Ubuntu 20.04 LTS (Focal) or later. If disk-image-builder is run on an
older version you may see the following error:
INFO diskimage_builder.block_device.utils [-] Calling [sudo kpartx -uvs /dev/loop7]
ERROR diskimage_builder.block_device.blockdevice [-] Create failed; rollback initiated
Install the disk-image-builder and ironic-python-agent-builder:
pip3 install --user diskimage-builder ironic-python-agent-builder
Build the IPA deploy images
These images will be used to PXE boot the bare metal node for installation.
Create a folder for the images:
export IMAGE_DIR="$HOME/images"
mkdir -p $IMAGE_DIR
ironic-python-agent-builder ubuntu \
     -o $IMAGE_DIR/ironic-python-agent
Build the bare metal OS images
These images will be deployed to the bare metal server.
Generate Bionic and Focal images:
for release in bionic focal
do
  export DIB_RELEASE=$release
  disk-image-create --image-size 5 \
     ubuntu vm dhcp-all-interfaces \
     block-device-efi \
     -o $IMAGE_DIR/baremetal-ubuntu-$release
done
Command argument breakdown:
ubuntu: builds an Ubuntu image
vm: The image will be a “whole disk” image
dhcp-all-interfaces: Will use DHCP on all interfaces
block-device-efi: Creates a GPT partition table, suitable for booting an EFI system
Upload images to Glance
Convert images to raw. Not necessarily needed, but this will save CPU cycles at deployment time:
for release in bionic focal
do
  qemu-img convert -f qcow2 -O raw \
     $IMAGE_DIR/baremetal-ubuntu-$release.qcow2 \
     $IMAGE_DIR/baremetal-ubuntu-$release.img
  rm $IMAGE_DIR/baremetal-ubuntu-$release.qcow2
done
Upload OS images. Operating system images need to be uploaded to the Swift backend if we plan to use direct deploy mode:
for release in bionic focal
do
  glance image-create \
     --store swift \
     --name baremetal-${release} \
     --disk-format raw \
     --container-format bare \
     --file $IMAGE_DIR/baremetal-ubuntu-${release}.img
done
Upload IPA images:
glance image-create \
    --store swift \
    --name deploy-vmlinuz \
    --disk-format aki \
    --container-format aki \
    --visibility public \
    --file $IMAGE_DIR/ironic-python-agent.kernel

glance image-create \
    --store swift \
    --name deploy-initrd \
    --disk-format ari \
    --container-format ari \
    --visibility public \
    --file $IMAGE_DIR/ironic-python-agent.initramfs
Save the image IDs as variables for later:
export DEPLOY_VMLINUZ_UUID=$(openstack image show deploy-vmlinuz --format json| jq -r .id)
export DEPLOY_INITRD_UUID=$(openstack image show deploy-initrd --format json| jq -r .id)
Create flavors for bare metal
Flavor characteristics like memory and disk are not used for scheduling. Disk
size is used to determine the root partition size of the bare metal node. If in
doubt, make the DISK_GB variable smaller than the size of the disks you are
deploying to. The cloud-init process will take care of expanding the
partition on first boot.
# Match these to your HW
export RAM_MB=4096
export CPU=4
export DISK_GB=6
export FLAVOR_NAME="baremetal-small"
Create a flavor and set a resource class. We will add the same resource class to the node we will be enrolling later. The scheduler will use the resource class to find a node that matches the flavor:
openstack flavor create --ram $RAM_MB --vcpus $CPU --disk $DISK_GB $FLAVOR_NAME
openstack flavor set --property resources:CUSTOM_BAREMETAL_SMALL=1 $FLAVOR_NAME
Disable scheduling based on standard flavor properties:
openstack flavor set --property resources:VCPU=0 $FLAVOR_NAME
openstack flavor set --property resources:MEMORY_MB=0 $FLAVOR_NAME
openstack flavor set --property resources:DISK_GB=0 $FLAVOR_NAME
Note
Ultimately, the end user will receive the whole bare metal machine. Its resources will not be limited in any way. The above settings orient the scheuduler to bare metal machines.
Enroll a node
Note
Virutally all of the settings below are specific to one’s environment. The following is provided as an example.
Create the node and save the UUID:
export NODE_NAME01="ironic-node01"
export NODE_NAME02="ironic-node02"
openstack baremetal node create --name $NODE_NAME01 \
     --driver ipmi \
     --deploy-interface direct \
     --driver-info ipmi_address=10.10.0.1 \
     --driver-info ipmi_username=admin \
     --driver-info ipmi_password=Passw0rd \
     --driver-info deploy_kernel=$DEPLOY_VMLINUZ_UUID \
     --driver-info deploy_ramdisk=$DEPLOY_INITRD_UUID \
     --driver-info cleaning_network=$NETWORK_ID \
     --driver-info provisioning_network=$NETWORK_ID \
     --property capabilities='boot_mode:uefi' \
     --resource-class baremetal-small \
     --property cpus=4 \
     --property memory_mb=4096 \
     --property local_gb=20

openstack baremetal node create --name $NODE_NAME02 \
     --driver ipmi \
     --deploy-interface direct \
     --driver-info ipmi_address=10.10.0.1 \
     --driver-info ipmi_username=admin \
     --driver-info ipmi_password=Passw0rd \
     --driver-info deploy_kernel=$DEPLOY_VMLINUZ_UUID \
     --driver-info deploy_ramdisk=$DEPLOY_INITRD_UUID \
     --driver-info cleaning_network=$NETWORK_ID \
     --driver-info provisioning_network=$NETWORK_ID \
     --resource-class baremetal-small \
     --property capabilities='boot_mode:uefi' \
     --property cpus=4 \
     --property memory_mb=4096 \
     --property local_gb=25


export NODE_UUID01=$(openstack baremetal node show $NODE_NAME01 --format json | jq -r .uuid)
export NODE_UUID02=$(openstack baremetal node show $NODE_NAME02 --format json | jq -r .uuid)
Create a port for the node. The MAC address must match the MAC address of the network interface attached to the bare metal server. Make sure to map the port to the proper physical network:
openstack baremetal port create 52:54:00:6a:79:e6 \
     --node $NODE_UUID01 \
     --physical-network=physnet2

openstack baremetal port create 52:54:00:c5:00:e8 \
     --node $NODE_UUID02 \
     --physical-network=physnet2
Make the nodes available for deployment
openstack baremetal node manage $NODE_UUID01
openstack baremetal node provide $NODE_UUID01

openstack baremetal node manage $NODE_UUID02
openstack baremetal node provide $NODE_UUID02
At this point, a bare metal node list will show the bare metal machines going into a cleaning phase. If that is successful, they bare metal nodes will become available.
openstack baremetal node list
Boot a bare metal machine
openstack server create \
     --flavor baremetal-small \
     --key-name mykey test
