[ English | 한국어 (대한민국) | Indonesia | 中文 (简体, 中国) | español (México) | English (United Kingdom) | Deutsch ]
Using Gerrit
Note
This section assumes you have completed Setting Up Your Gerrit Account guide.
Gerrit allows you:
Get reviews on your changes proposed to OpenStack repositories
Request reviews from specific community members
Make quick changes to your patches in the WebUI
Pushing A Change
Note
This is a quick start version. For a more in depth description of how to clone, create a patch and push the change, directions can be found here
Following is a list of the commands that you need to know for your first contribution:
To clone a copy of some repository:
git clone https://opendev.org/openstack/<PROJECT_NAME>
Note
You can find the same repositories using the search function here: OpenDev git repository browser
After you’ve completed the Set Up and Learn GIT section, the following command
configures the repository to know about Gerrit and installs the Change-Id
commit hook. You only need to do this once per repository you clone:
git review -s
To create your development branch (substitute branch_name for a name of your choice). It’s better to create a new branch for each patch than working from master:
git checkout -b <branch_name>
To check the files that have been updated in your branch:
git status
To check the differences between your branch and the repository:
git diff master
Assuming you have not added new files, you commit all your changes using:
git commit -a
Read the Summary of Git commit message structure for best practices on writing the commit message. When you are ready to send your changes for review use:
git review
If successful, the Git response message will contain a URL you can use to track your changes.
If you need to make further changes to the same review, you can commit them using:
git commit -a --amend
This will commit the changes under the same set of changes you issued earlier. Notice that in order to send your latest version for review, you will still need to call:
git review
Tracking your Changes
After proposing changes, you can track them at Code Review. After logging in, you will see a dashboard of “Outgoing reviews” for changes you have proposed, “Incoming reviews” for changes you are reviewing, and “Recently closed” changes for which you were either a reviewer or owner.
Adding Reviewers
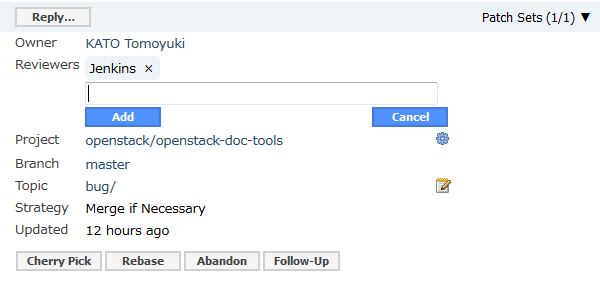
Sometimes there might be people you need to weigh in on your patch because they have a vested interest or are helping mentor you. The easiest way of letting them know you have uploaded a new patch or patchset is to add them as reviewers in the Gerrit WebUI. You can look them up by name, Gerrit email address, ssh user name, or Gerrit id.

In general, its best to avoid over using this Gerrit capability because each interaction with the patch- new patchsets, comments, CI system votes, etc.- will send an email notification to every reviewer on the patch.
Note
If you review a patch you are automatically added to the list of reviewers.
Gerrit Web Editor
It is possible to edit your patch in the Gerrit web interface and publish the change without making the change locally. This is not generally advised for larger code updates since it doesn’t automatically update your local working branch. In some cases, where the patch is basically ready to merge aside from a small pep8 failure- whitespace at the end of line, needing to wrap a line, etc- this Gerrit feature can be convenient to make a quick edit and publish the change without having to go through the entire ‘git add’, ‘git commit –amend’, ‘git review’ process.
To access the Gerrit Web Editor click on the icon that looks like a pencil writing on paper next to the patch set number at the top of a Gerrit Code Review page for a file.

Reviewing Changes
Reviewing changes is often suggested as a way to get started on a project. Whether this is how you choose to get started or not, it’s an important community activity. See How to Review Changes the OpenStack Way for more detailed guidance on when to use which votes on a change review.
Inline Comments
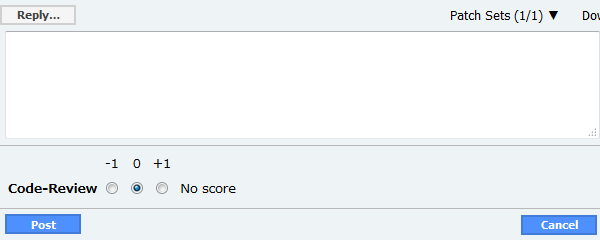
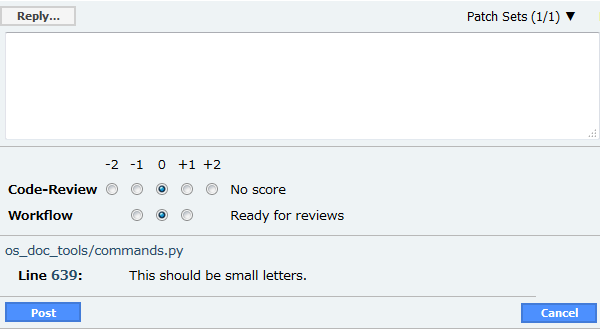
If you have questions about the way something is phrased or done, or have found some other issue the easiest way to let the author of the patch know is to comment on that place inline. The inline comments are posted collectively when you hit the ‘Reply’ button and add your vote on the patchset.
Note
Until you click ‘Reply’ and vote on the patch, any inline comments you’ve made exist as drafts.
+/- 1 & 0
The basic set of values contributors have to vote with on a patch is: -1, 0, or +1. These values correspond to a relatively simple system.

-1: This patch needs further work before it can be merged. A -1 is usually given when the reviewer sees some issue that needs to be fixed before the patch can be merged. The issues the author needs to address would, ideally, have inline comments posted on them unless there is some larger issue. If there is something wrong with the overall approach, you are able to leave an overall comment with the vote to raise your concerns.
Note
If your patch gets a -1 it is not bad news, it just means you need to do a little more work.
0: No score. This is the default score when replying to a patchset. Generally it’s kept as the vote when someone has a question about the patchset or doesn’t have a fully formed opinion of the patchset yet - it requires more time, testing, or investigation.
+1: Looks good to me, but someone else must approve. This does not mean that there is nothing to comment on, just that there aren’t any issues that would block the merging of the patch. You can still make comments on nitpicky things the patch owner can address if others find issues with the patch. These comments might also be something to address in a follow up patch as opposed to another patchset.
+/- 2 & +W
Core reviewers have additional voting choices aside from the basic set. Like the basic set, the numbers map to a simple system of meaning:

-2: Do not merge. This score does not often appear and when it does, it’s for a good reason:
Most often, some deadline has passed and since no more changes are being accepted till the new release development begins, the patch is being held.
There is an issue with the approach taken in the patch and it needs to be discussed with a larger group, likely in a meeting.
The patch submitted is a duplicate or at odds with another patch submitted.
Note
Only the person that voted the -2 can remove the vote and it will persist on all new patchsets.
+2: Looks good to me (core reviewer). Depending on the project team and repository, merging a patch will require at least one +2 vote if not two +2 votes.
+W: Approved. This patch will now be run through a final round of checks before it is merged into the repository.
Reviewing Best Practices
If you can, test the code! In some cases you may not have access to the specific hardware needed, but in general you should be able to test the changes or look at the Zuul build of the documentation so that you are doing more than just looking at the code or documentation change.
Checking Out Others’ Changes
It is possible to check out other contributors’ patches from Gerrit and even make changes to them; however, you should always discuss any changes with the contributor before you start working on their patch.
git-review -d <change ID>
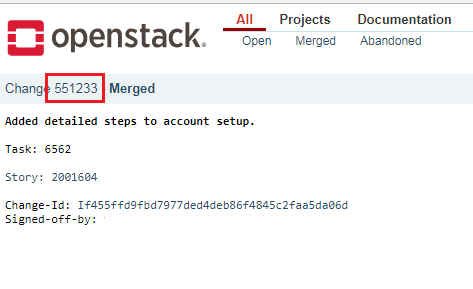
The change ID can be found on the web UI of Gerrit:

After checking out the patch, you will be switched to a new branch automatically, on which you can make your changes.
Cherry-picking
If your commit depends on a change which has been updated since you started your work, and you need to get the latest patchset from that change, you can cherry-pick your own changes on top of it:
git review -x <change ID>
The change ID is the same as in the previous case.
Backports
In order to backport a commit that has been merged to master, the commit must be backported to all open branches between master and the target branch (even if some of those branches are Unmaintained). If a commit must be backported to multiple branches, each backport should be cherry-picked from the next-newest backport. For example, to cherry-pick change I06b19044 with change number 946581 from master (2025.2) to stable/2024.1:
git fetch --all
git checkout -b bug/123 gerrit/stable/2025.1
git review -X 946581
git review -f         # Uploads change number 950213
git checkout -b bug/123 gerrit/stable/2024.2
git review -X 950213
git review -f         # Uploads change number 950215
git checkout -b bug/123 gerrit/stable/2024.1
git review -X 950215
git review -f         # Uploads change number 950217
The final change should have several (cherry picked from <sha>) at the bottom of the commit message.
See Stable Branches for more information.
